BT Shield (Master Slave)
Contents
- 1 Overview
- 2 Specifications
- 3 Electrical Characteristics
- 4 Hardware
- 5 AT command
- 5.1 1. Test command:
- 5.2 2. Reset
- 5.3 3. Get firmware version
- 5.4 4. Restore default
- 5.5 5. Get module address
- 5.6 6. Set/Check module name:
- 5.7 7. Get the Bluetooth device name:
- 5.8 8. Set/Check module mode:
- 5.9 9. Set/Check device class
- 5.10 10. Set/Check GIAC (General Inquire Access Code)
- 5.11 11. Set/Check -- Query access patterns
- 5.12 12. Set/Check PIN code:
- 5.13 13. Set/Check serial parameter:
- 5.14 14. Set/Check connect mode:
- 5.15 15. Set/Check fixed address:
- 5.16 16. Set/Check LED I/O
- 5.17 17. Set PIO output
- 5.18 18. Set/Check – scan parameter
- 5.19 19. Set/Check – SHIFF parameter
- 5.20 20. Set/Check security mode
- 5.21 21. Delete Authenticated Device
- 5.22 22. Delete All Authenticated Device
- 5.23 23. Search Authenticated Device
- 5.24 24. Get Authenticated Device Count
- 5.25 25. Most Recently Used Authenticated Device
- 5.26 26. Get the module working state
- 5.27 27. Initialize the SPP profile lib
- 5.28 28. Inquiry Bluetooth Device
- 5.29 29. Cancel Inquiring Bluetooth Device
- 5.30 30. Equipment Matching
- 5.31 31. Connect Device
- 5.32 32. Disconnect
- 5.33 33. Energy-saving mode
- 5.34 34. Exerts Energy-saving mode
- 6 Download
- 7 Useful Links
Overview
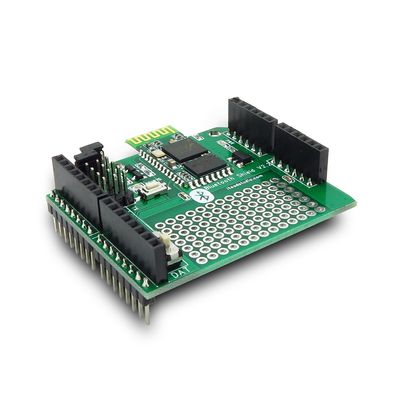
BT shield V2.2 is a serial port Bluetooth module (with master and slave mode) breakout board, it’s compatible with Arduino and IFlat-32, it can directly plug on Arduino/IFlat-32 board, use UART port for communication with Arduino/IFlat-32 or PC.
Specifications
| Microprocessor | CSR BC417 |
| PCB size | 53.3mm X 47mm X 1.6mm |
| Indicators | PWR,State |
| Power supply | 5V DC |
| IO | 6 |
| Communication Protocol | UART/Bluetooth 2.0 |
| RoSH | Yes |
Electrical Characteristics
| Specification | Min | Type | Max | Unit |
| Power Voltage | 4.5 | 5 | 5.5 | VDC |
| Input Voltage VH (Target Voltage = 3.3V) | 3 | 3.3 | 3.6 | VDC |
| Input Voltage VH (Target Voltage = 5V) | 4.5 | 5 | 5.5 | V |
| Input Voltage VL: | -0.3 | 0 | 0.5 | V |
| Current Consumption | - | 20 | 40 | mA |
Hardware
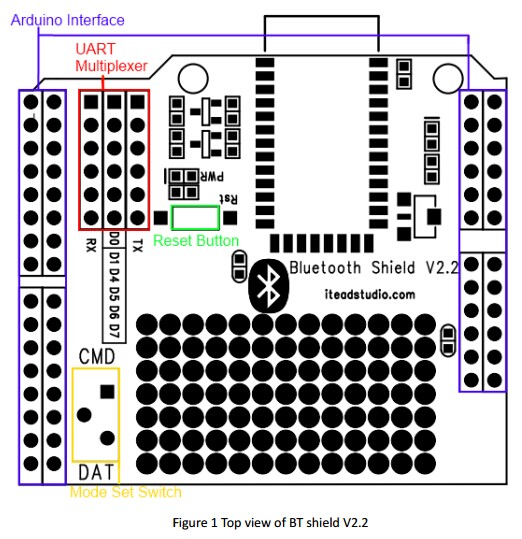
UART Multiplexer (For free UART connection setting)
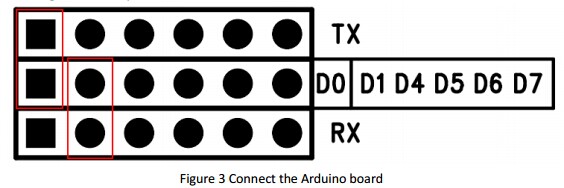
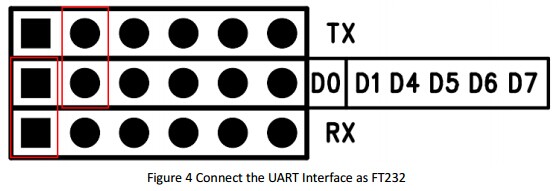
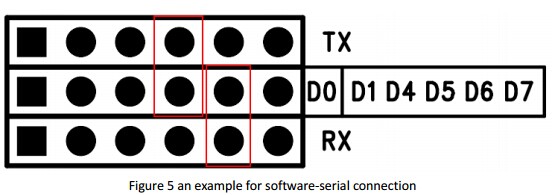
You can use the jumper to connect the TXD and RXD pins of HC-05 to D0, D1, D4~D7 pin of Arduino.
When using the connection as Figure 3, the BT shield connects to the ATMega328 chip on board.
When using the connection as Figure 4, the HC-05 connects with the FT232RL chip, and the FT232RL connect to PC by USB. Whit this configuration you can use the serial software on PC to control or configure the HC-05 module.
Except the 2 configurations above, you can connect the TXD and RXD to any other pins from D4-D7, and using the software-serial library to control the HC-05 module.
Mode Switch
The Mode Set Switch is connected to PIO11, when it is pushed to CMD and powered on, the HC-05 enter command mode, HC-05 module can receive and response AT command in this mode. When it is pushed to DATA and powered on. The HC-05 enters data mode and will not accept AT command.
States LED
When power on and disconnect the port, states LED blinks 1time/2s ; when the module connect and open the serial port, states LED blinks 2times/s.
AT command
1. Test command:
| Command | Respond | Parameter |
| AT | OK | - |
2. Reset
| Command | Respond | Parameter |
| AT+RESET | OK | - |
3. Get firmware version
| Command | Respond | Parameter |
| AT+VERSION? | +VERSION:<Param> OK | Param : firmware version |
Example:
AT+VERSION?\r\n
+VERSION:2.0-20100601
OK
4. Restore default
| Command | Respond | Parameter |
| AT+ORGL | OK | - |
Default state:
Slave mode, pin code :1234, device name: H-C-2010-06-01 ,Baud 38400bits/s.
5. Get module address
| Command | Respond | Parameter |
| AT+ADDR? | +ADDR:<Param> OK | Param: address of Bluetooth module |
Bluetooth address: NAP: UAP : LAP
Example:
AT+ADDR?\r\n
+ADDR:1234:56:abcdef
OK
6. Set/Check module name:
| Command | Respond | Parameter |
| AT+NAME=<Param> | OK | Param: Bluetooth module name (Default :HC-05) |
| AT+NAME? | +NAME:<Param> OK (/FAIL) | Param: Bluetooth module name (Default :HC-05) |
Example:
AT+NAME=HC-05\r\n set the module name to HC-05
OK
AT+NAME=ITeadStudio\r\n
OK
AT+NAME?\r\n
+NAME: ITeadStudio
OK
7. Get the Bluetooth device name:
| Command | Respond | Parameter |
| AT+RNAME?<Param1> | 1. +NAME:<Param2> OK 2. FAIL | Param1,Param 2 : the address of Bluetooth device |
Example: (Device address 00:02:72:od:22:24,name:ITead)
AT+RNAME? 0002,72,od2224\r\n
+RNAME:ITead
OK
8. Set/Check module mode:
| Command | Respond | Parameter |
| AT+ROLE=<Param> | OK | Param: 0- Slave 1-Master 2-Slave-Loop |
| AT+ ROLE? | +ROLE:<Param> OK | Param: 0- Slave 1-Master 2-Slave-Loop |
9. Set/Check device class
| Command | Respond | Parameter |
| AT+CLASS=<Param> | OK | Param: Device Class |
| AT+ CLASS? | 1. +CLASS:<Param> OK 2. FAIL | Param: Device Class |
10. Set/Check GIAC (General Inquire Access Code)
| Command | Respond | Parameter |
| AT+IAC=<Param> | 1.OK 2. FAIL | Param: GIAC (Default : 9e8b33) |
| AT+IAC | +IAC:<Param> OK | Param: GIAC (Default : 9e8b33) |
Example:
AT+IAC=9e8b3f\r\n
OK
AT+IAC?\r\n
+IAC: 9e8b3f
OK
11. Set/Check -- Query access patterns
| Command | Respond | Parameter |
| AT+INQM=<Param>,<Param2>, <Param3> | 1.OK 2. FAIL | Param: 0——inquiry_mode_standard 1——inquiry_mode_rssi Param2: Maximum number of Bluetooth devices to respond to Param3: Timeout (1-48 : 1.28s to 61.44s) |
| AT+ INQM? | +INQM :<Param>,<Param2>, <Param3> OK | Param: 0——inquiry_mode_standard 1——inquiry_mode_rssi Param2: Maximum number of Bluetooth devices to respond to Param3: Timeout (1-48 : 1.28s to 61.44s) |
Example:
AT+INQM=1,9,48\r\n
OK
AT+INQM\r\n
+INQM:1, 9, 48
OK
12. Set/Check PIN code:
| Command | Respond | Parameter |
| AT+PSWD=<Param> | OK | Param: PIN code (Default 1234) |
| AT+ PSWD? | + PSWD :<Param> OK | Param: PIN code (Default 1234) |
13. Set/Check serial parameter:
| Command | Respond | Parameter |
| AT+UART=<Param>,<Param2>,<Param3> | OK | Param1: Baud Param2: Stop bit Param3: Parity |
| AT+UART? | +UART=<Param>,<Param2>, <Param3> OK | Param1: Baud Param2: Stop bit Param3: Parity |
Example:
AT+UART=115200,1,2,\r\n
OK
AT+UART?
+UART:115200,1,2
OK
14. Set/Check connect mode:
| Command | Respond | Parameter |
| AT+CMODE=<Param> | OK | Param: 0 - connect fixed address 1 - connect any
address 2 - slave-Loop |
| AT+ CMODE? | + CMODE:<Param> OK | Param: 0 - connect fixed address 1 - connect any address 2 - slave-Loop |
15. Set/Check fixed address:
| Command | Respond | Parameter |
| AT+BIND=<Param> | OK | Param: Fixed address (Default 00:00:00:00:00:00) |
| AT+ BIND? | + BIND:<Param> OK | Param: Fixed address (Default 00:00:00:00:00:00) |
Example:
AT+BIND=1234,56,abcdef\r\n
OK
AT+BIND?\r\n
+BIND:1234:56:abcdef
OK
16. Set/Check LED I/O
| Command | Respond | Parameter |
| AT+POLAR=<Param1,<Param2> | OK | Param1: 0- PIO8 low drive LED 1- PIO8 high drive
LED Param2: 0- PIO9 low drive LED 1- PIO9 high drive LED |
| AT+ POLAR? | + POLAR=<Param1>,<Param2> OK | Param1: 0- PIO8 low drive LED 1- PIO8 high drive LED Param2: 0- PIO9 low drive LED 1- PIO9 high drive LED |
17. Set PIO output
| Command | Respond | Parameter |
| AT+PIO=<Param1>,<Param2> | OK | Param1: PIO number Param2: PIO level 0- low 1- high |
Example:
1. PIO10 output high level
AT+PI0=10,1\r\n
OK
18. Set/Check – scan parameter
| Command | Respond | Parameter |
| AT+IPSCAN=<Param1>,<Param2>,<Param3>,<Param4> | OK | Param1: Query time interval
Param2 : Query duration Param3 : Paging interval Param4 : Call duration |
| AT+IPSCAN? | +IPSCAN:<Param1>,<Param2>,<Param3>,<Param4> OK | Param1: Query time interval Param2 : Query duration Param3 : Paging interval Param4 : Call duration |
Example:
AT+IPSCAN =1234,500,1200,250\r\n
OK
AT+IPSCAN?
+IPSCAN:1234,500,1200,250
19. Set/Check – SHIFF parameter
| Command | Respond | Parameter |
| AT+SNIFF=<Param1>,<Param2>,<Param3>,<Param4> | OK | Param1: Max time Param2: Min time Param3: Retry time Param4: Time out |
| AT+ SNIFF? | +SNIFF:<Param1>,<Param2>,<Param3>,<Param4> OK | Param1: Max time Param2: Min time Param3: Retry time Param4: Time out |
20. Set/Check security mode
| Command | Respond | Parameter |
| AT+SENM=<Param1>,<Param2> | 1. OK 2. FAIL | Param1:
0——sec_mode0+off 1——sec_mode1+ non_secure 2——sec_mode2_ service 3——sec_mode3_l ink 4——sec_mode_u nknown Param2: 0——hci_enc_mod e_off 1——hci_enc_mod e_pt_to_pt 2——hci_enc_mod e_pt_to_pt_and_b cast |
| AT+ SENM? | + SENM:<Param1>,<Param2> OK | Param1:
0——sec_mode0+off 1——sec_mode1+ non_secure 2——sec_mode2_ service 3——sec_mode3_l ink 4——sec_mode_u nknown Param2: 0——hci_enc_mod e_off 1——hci_enc_mod e_pt_to_pt 2——hci_enc_mod e_pt_to_pt_and_b cast |
21. Delete Authenticated Device
| Command | Respond | Parameter |
| AT+PMSAD=<Param> | OK | Param: Authenticated Device Address |
Example:
AT+PMSAD =1234,56,abcdef\r\n
OK
22. Delete All Authenticated Device
23. Search Authenticated Device
24. Get Authenticated Device Count
25. Most Recently Used Authenticated Device
26. Get the module working state
27. Initialize the SPP profile lib
28. Inquiry Bluetooth Device
29. Cancel Inquiring Bluetooth Device
30. Equipment Matching
31. Connect Device
32. Disconnect
33. Energy-saving mode
34. Exerts Energy-saving mode
Application Example This is a demo that HC-05 is a master device and communicates to hc-06.
Step 1. Push the mode switch to CMD
Step 2. Power on, module enter command state
Step 3. Using baud rate 38400, send the ―AT+ROLE=1\r\n‖ to module, with ―OK\r\n‖ means setting successes.
Step 4. Send ―AT+CMODE=1\r\n‖, set HC-05 connect to any address, with ―OK\r\n‖ means setting successes.
 Notice