IComSat
Contents
Overview
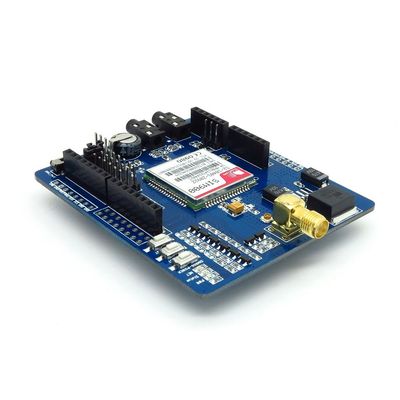
IComsat is a GSM/GPRS shield for Arduino and based on the SIM900 Quad-band GSM/GPRS module. It is controlled via AT commands (GSM 07.07 ,07.05 and SIMCOM enhanced AT Commands), and fully compatible with Arduino / Iteaduino and Mega.
Go shopping IComSat (IM120417009)
Features
- Quad-Band 850/900/1800/1900MHz
- GPRS multi-slot calss 10/8
- GPRS mobile station class B
- Compliant to GSM phase 2/2+
- Class 4 (2W@850/900MHz)
- Class 1 (1W@1800/1900MHz)
- Control via commands (GSM 07.07, 07.05 and SIMCOM enhanced AT Commands)
- Short message service
- Free serial port selection
- All SIM900 pins breakout
- RTC supported with Super Cap
- Power on/off and reset function supported by Arduino interface
Specifications
| PCB size | 77.2mm X 66.0mm X 1.6mm |
| Indicators | PWR, status LED, net status LED |
| Power supply | 9~20V, compatible with Arduino |
| Communication Protocol | UART |
| RoSH | Yes |
Electrical Characteristics
| Parameter | Min. | Typical | Max. | Unit |
| Power voltage (Vlogic) | 4.5 | 5 | 5.5 | VDC |
| Input voltage (Vsupply) | 9 | - | 20 | V |
| Input voltage VH | 4.5 | 5 | 5.5 | V |
| Input voltage VL | -0.3 | 0 | 0.5 | V |
| Current Consumption(pulse) | - | - | 2000 | mA |
| Current Consumption(Continues) | 500 | mA | ||
| Baud rate | 9600 | bps |
Hardware

Figure 1 Top Map
| Interface | Pin | Description |
| GPIOs | 1 | VDD |
| GPIOs | 2 | GND |
| GPIOs | 3 | GPIO1 |
| GPIOs | 4 | GPIO2 |
| GPIOs | 5 | GPIO3 |
| GPIOs | 6 | GPIO4 |
| GPIOs | 7 | GPIO5 |
| GPIOs | 8 | GPIO6 |
| GPIOs | 9 | GPIO7 |
| GPIOs | 10 | GPIO8 |
| GPIOs | 11 | GPIO9 |
| GPIOs | 12 | GPIO10 |
| GPIOs | 13 | GPIO11 |
| GPIOs | 14 | GPIO12 |
| GPIOs | 15 | GND |
| GPIOs | 16 | VDD |
| UART | 1 | GND |
| UART | 2 | DTR |
| UART | 3 | RI |
| UART | 4 | DCD |
| UART | 5 | CTS |
| UART | 6 | RTS |
| UART | 7 | TXD |
| UART | 8 | RXD |
| IIC&PWM | 1 | GND |
| IIC&PWM | 2 | GND |
| IIC&PWM | 3 | IIC_SCL |
| IIC&PWM | 4 | IIC_SDA |
| IIC&PWM | 5 | PWM2 |
| IIC&PWM | 6 | PWM1 |
| IIC&PWM | 7 | GND |
| IIC&PWM | 8 | GND |
| Debug_Port | 1 | GND |
| Debug_Port | 2 | PERKEY |
| Debug_Port | 3 | DBG_RXD |
| Debug_Port | 4 | DBG_TXD |
VDD = 3.0V
Note1: the operation level of the port is 3.0V
Installation
UART Multiplexer (For free UART connection setting)
You can use the jumper to connect the TXD and RXD pins on SIM to any pins of Arduino D0 – D7.
When using the connection as Figure 4, the SIM900 connect to the ATMega328 chip on board.
When you using the connection as Figure 5, the SIM900 connect with the FT232RL chip, and the FT232RL connect to PC by USB. Whit this configuration you can use the serial software on PC to control or configure the SIM900 module.
Except the 2 configurations above, you can connect the TXD and RXD to any other pins from D0-D1, and using the software-serial library to control the SIM900 moudle.
Com Switch
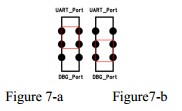
There is a com switch for selecting the communicate port to UART port or Debug port of SIM900 module as the following figure 7. When connect to the SIM900 debug port, the UART multiplexer just can be set as Figure 4 or 5.
RI Behavior Output
There is a Jumper for configuration of RI, one to connect D2, another to connect D14.
| Status | RI response |
| Standby | High |
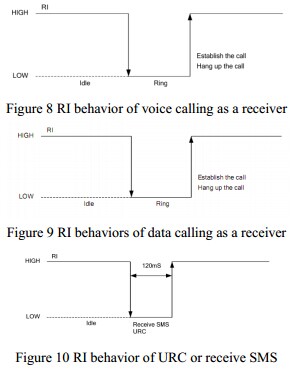
| Voice call | The pin is changed to low. When any of the following events occur, the pin will be changed to high: (1) Establish the call (2) Hang up the call |
| Data call | The pin is changed to low. When any of the following events occur, the pin will be changed to high: (3) Establish the call (4) Hang up the call |
| SMS | The pin is changed to low, and kept low for 120ms when a SMS is received. Then it is changed to high |
| URC | The pin is changed to low, and kept low for 120ms when some URCs are reported. Then it is changed to high. |
The behavior of the RI pin is shown in the following figure when SIM900 module is used as a receiver.
When the IComSat is used as caller, the RI will remain high.
Indicator LED and Buttons
NETSTATUS: The status of the NETSTATUS LED is listed in following table:
| Status | Description |
| Off | SIM900 is not running |
| 64ms On/800ms Off | SIM900 not registered the network |
| 64ms On/3000ms Off | SIM900 registered to the network |
| 64ms On/300ms Off | GPRS communication is established |
STATUS: Power status of SIM900. PWR: Power status of IcomSat.
SIM900-POWER: After the IcomSat power on, you need to press the SIM900-POWER button for a moment to power on the SIM900 module. The pin 9 of Arduino interface is connecting to PWRKEY, and a high pulse with 500ms wide can power on/off it.
Sim900-RST: Reset the SIM900. The D8 of Arduino interface is connecting to RESRT of SIM900, and a high pulse with 500ms wide can power on/off it.
Arduino-RST: Reset the Arduino.
Software Notes
1. User must wait URC “CALL READY”(with fixed baud rate) then you can operate SIM card when user powers on the module, or can use AT+CCALR to inquire the states of “CALL READY”
2. When user meets error 512 or 515, First user should check if operate SIM card before “CALL READY”, and second should check if memory of SIM card is full.
Download
SIM900 At Command Manual V1.03
Useful Links
MarcoMartines's GitHub Page <GSM/GPRS & GPS Shield Library for modules using SIM900/SIM908>
 Notice


