Difference between revisions of "XBee Shield"
(→Installation) |
(→Overview) |
||
| (2 intermediate revisions by the same user not shown) | |||
| Line 3: | Line 3: | ||
[[File:Xbeeshield.jpg|thumb|400px|right]] | [[File:Xbeeshield.jpg|thumb|400px|right]] | ||
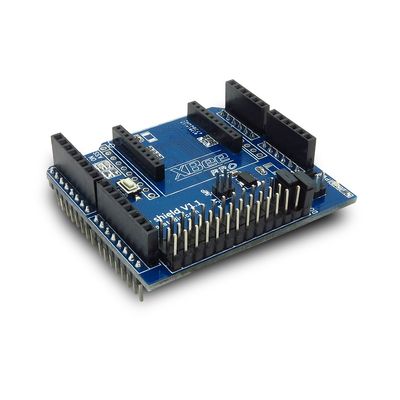
The XBee [[Shield]] simplifies the task of interfacing an XBee with your Arduino. This board mates directly with an Arduino Pro or USB board, and equips it with wireless communication capabilities using the popular XBee module. This unit works with all XBee modules including the Series 1 and Series 2 (and 2.5), standard and Pro version. | The XBee [[Shield]] simplifies the task of interfacing an XBee with your Arduino. This board mates directly with an Arduino Pro or USB board, and equips it with wireless communication capabilities using the popular XBee module. This unit works with all XBee modules including the Series 1 and Series 2 (and 2.5), standard and Pro version. | ||
| + | |||
| + | Go shopping [http://imall.iteadstudio.com/im120417004.html XBee Shield (IM120417004)] | ||
==Features== | ==Features== | ||
| Line 83: | Line 85: | ||
==Wireless Arduino program upload by XBee== | ==Wireless Arduino program upload by XBee== | ||
| + | XBee [[shield]] support program Arduino platform by wireless. Only XB24 series support wireless | ||
| + | Arduino program. | ||
| + | |||
| + | 1) Set the jumper connecting | ||
| + | |||
| + | 2) Configure the Transmitter and the receiver as the Ladyada website | ||
| + | [http://ladyada.net/make/xbee/arduino.html http://ladyada.net/make/xbee/arduino.html] | ||
| + | |||
| + | 3) After configuration plug the receive XBee module into XBee [[shield]] socket | ||
| + | |||
| + | 4) Plug the Transmit XBee [[shield]] into [[Foca]] 2.0 | ||
| + | [http://iteadstudio.com/store/index.php?main_page=product_info&cPath=18&products_id=94 http://iteadstudio.com/store/index.php?main_page=product_info&cPath=18&products_id=94] | ||
| + | |||
| + | 5) Upload the program to transmitter XBee and wireless programming will begin | ||
==Download== | ==Download== | ||
| + | [ftp://imall.iteadstudio.com/IM120417004_XBeeShield/DS_IM120417004_XBeeShield.pdf Datasheet for XBee Shield] | ||
| + | |||
| + | [ftp://imall.iteadstudio.com/IM120417004_XBeeShield/SCH_IM120417004_XBeeShield.pdf Schematic for XBee Shield] | ||
==Useful Links== | ==Useful Links== | ||
Latest revision as of 06:03, 11 June 2014
Contents
Overview
The XBee Shield simplifies the task of interfacing an XBee with your Arduino. This board mates directly with an Arduino Pro or USB board, and equips it with wireless communication capabilities using the popular XBee module. This unit works with all XBee modules including the Series 1 and Series 2 (and 2.5), standard and Pro version.
Go shopping XBee Shield (IM120417004)
Features
- Double shield interfaces compatible with Arduino for easy cascading
- 3 indicator (ON/SLEEP, RSSI, ASS) LED for XBee
- Provide maximal 500mA under 3.3V
- Full 2.54mm break out for XBee
- Switchable of communication with FTDI-USB or Arduino with HardwareSerial or SoftwareSerial
(1)RSSI: Receiver Signal Strength Indication
(2)ASS : Association
Specifications
| PCB size | 54.9mm X 58.8mm X 1.6mm |
| Indicators | PWR State, DI, DO, RSSI, ON, ASS |
| Power supply | 5V DC |
| Communication Protocol | UART/XBee |
| RoSH | Yes |
Electrical Characteristics
| Specification | Min | Type | Max | Unit |
| Power Voltage | 4.5 | 5 | 5.5 | VDC |
| Input Voltage VH: | 4.5 | 5 | 5.5 | V |
| Input Voltage VL: | -0.3 | 0 | 0.5 | V |
| Current Consumption | - | 20 | 40 | mA |
Hardware

| Zone | Description |
| 1 | XBee Socket |
| 2 | Indication LED |
| 3 | Serial communication pin select |
| 4 | Wireless program Arduino jumper |
| 5 | 3.3V operation voltage jumper(When operated in 3.3V,install the jumper) |
Installation
In zone 3, two jumpers are set to connect XBee_DIN, XBee_DOUT to Digital pin of Arduino. When XBee communicate to Arduino hardware serial ports, set the jumper connect DIN to D1, DOUT to D0.
When XBee communicate to FTDI-232 hardware serial ports, set the jumper connect DIN to D0, DOUT to D1.
When XBee communicate to Arduino software serial ports, set the jumper connect DIN to D2~13, DOUT to D2~D13 by the setting from the code. The SoftwareSerial of Arduino link: http://arduino.cc/en/Reference/SoftwareSerial
Wireless Arduino program upload by XBee
XBee shield support program Arduino platform by wireless. Only XB24 series support wireless Arduino program.
1) Set the jumper connecting
2) Configure the Transmitter and the receiver as the Ladyada website http://ladyada.net/make/xbee/arduino.html
3) After configuration plug the receive XBee module into XBee shield socket
4) Plug the Transmit XBee shield into Foca 2.0 http://iteadstudio.com/store/index.php?main_page=product_info&cPath=18&products_id=94
5) Upload the program to transmitter XBee and wireless programming will begin
 Notice

