Difference between revisions of "RASPBERRY PI OLED ADD-ON/zh-cn"
From ITEAD Wiki
(Created page with "==特色==") |
m |
||
| (14 intermediate revisions by the same user not shown) | |||
| Line 9: | Line 9: | ||
==特色== | ==特色== | ||
| − | * | + | *为树莓派量身定做,不用接线,即插即用 |
| − | *0. | + | *可堆叠 |
| − | + | *0.96英寸 128*64 像素点单色OLED屏幕 | |
| − | * | + | *提供1组Grove电子积木口 |
| − | == | + | ==规格== |
{| border="1" | {| border="1" | ||
| − | | | + | |PCB大小||48.35mm X 48.47mm X1.6mm |
|- | |- | ||
| − | | | + | |接口||RPI 26pins Interface X2,UART |
|- | |- | ||
|} | |} | ||
| − | == | + | ==电气特性== |
{| class="wikitable" | {| class="wikitable" | ||
| − | | align="center" style="background:#f0f0f0;"|''' | + | | align="center" style="background:#f0f0f0;"|'''特性''' |
| − | | align="center" style="background:#f0f0f0;"|''' | + | | align="center" style="background:#f0f0f0;"|'''标示''' |
| − | | align="center" style="background:#f0f0f0;"|''' | + | | align="center" style="background:#f0f0f0;"|'''最小值''' |
| − | | align="center" style="background:#f0f0f0;"|''' | + | | align="center" style="background:#f0f0f0;"|'''正常值''' |
| − | | align="center" style="background:#f0f0f0;"|''' | + | | align="center" style="background:#f0f0f0;"|'''最大值''' |
| − | | align="center" style="background:#f0f0f0;"|''' | + | | align="center" style="background:#f0f0f0;"|'''单位''' |
|- | |- | ||
| − | | | + | |电源电压||VDD||3||3.3||3.5||V |
|- | |- | ||
| − | | | + | |最高输入电压||VIH||0.8XVDD||-||VDD||V |
|- | |- | ||
| − | | | + | |最低输入电压||VIL||0||-||0.2XVDD||V |
|- | |- | ||
| − | | | + | |VDD可调电流||IDD||-||180||300||uA |
|- | |- | ||
|} | |} | ||
| − | == | + | ==硬件== |
[[File:IM140714003pic1.jpg|500px]] | [[File:IM140714003pic1.jpg|500px]] | ||
[[File:IM140714003pic2.jpg|500px]] | [[File:IM140714003pic2.jpg|500px]] | ||
[[File:IM140714003pic3.jpg|500px]] | [[File:IM140714003pic3.jpg|500px]] | ||
| − | + | 引脚图 | |
{| class="wikitable" | {| class="wikitable" | ||
| Line 112: | Line 112: | ||
|} | |} | ||
| − | == | + | ==使用说明== |
| − | * | + | *将RpiOledAddon插到RPI V2上面,上电。 |
| − | * | + | *修改文件 /etc/modprobe.d/raspi-balcklist.conf |
| − | : | + | :修改后的编码如下:请将^符号修改成# |
| − | ::blacklist spi-bcm2708 | + | ::^blacklist spi-bcm2708 |
| − | ::blacklist i2c-bcm2708 | + | ::^blacklist i2c-bcm2708 |
| − | * | + | * 修改 /etc/modules |
| − | : | + | :在最后添加一行如下代码 |
::i2c-dev | ::i2c-dev | ||
| − | * | + | *重启树莓派 |
| − | * | + | *从这个链接https://github.com/itead/SDK 下载安装SDK |
| − | * | + | *进入这个目录 '''libraries/itead_SSD1306/examples/oled_Animation_Sample/''', 编译和运行文件 '''oled_Animation_Sample.ino''' |
| − | : | + | :编译 oled_Animation_Sample.ino 指令如下 |
::$ iteadcompile OLED oled_Animation_Sample.ino | ::$ iteadcompile OLED oled_Animation_Sample.ino | ||
| − | : | + | :运行指令如下 |
::$ sudo ./OLED | ::$ sudo ./OLED | ||
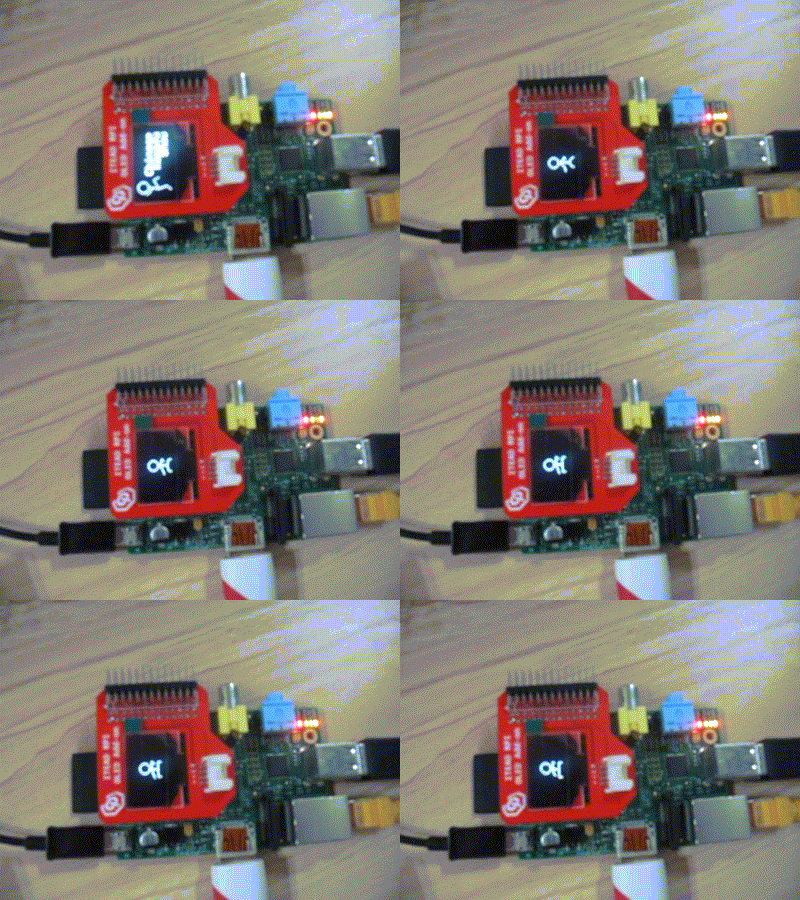
| − | * | + | *OLED会出现一个跳舞的小人。 |
[[File:IM140714003in1.gif|400px]] | [[File:IM140714003in1.gif|400px]] | ||
| − | == | + | ==文件下载== |
| − | [[File:SCH_IM140714003.pdf]] | + | 原理图----[[File:SCH_IM140714003.pdf]] |
| − | == | + | ==有用链接== |
| − | https://github.com/ | + | |
| − | https://github.com/ | + | https://github.com/itead/SDK |
| + | |||
| + | https://github.com/itead/SDK/tree/master/libraries/itead_SSD1306 | ||
Latest revision as of 03:13, 2 December 2014
概述
市面上很少能找到为树莓派量身定制的OLED屏幕,/在很多应用项目中,我们仅需要显示非常简单的一些信息,比如系统状态、IP等信息,/或者对便携性有较高需求,这时候用HDMI去接一个大屏幕明显不合适,一个小巧的OLED屏幕刚好能满足这种需求。
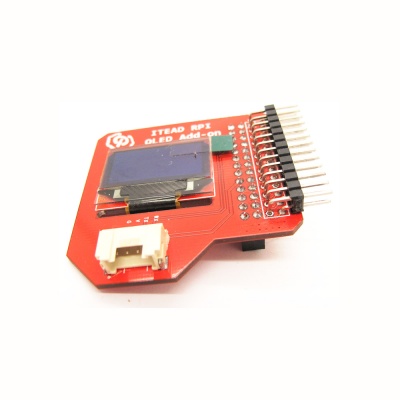
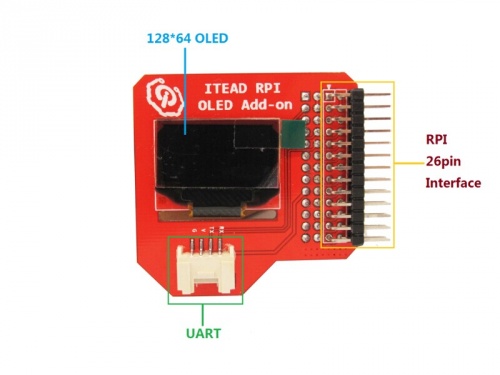
OLED Add-on是为树莓派量身定制的,板载一块0.96" 128*64 OLED屏幕,控制芯片为SSD1306,每一个像素点都可以通过SSD1306独立控制点亮或者关闭。
我们不仅仅只是提供一块可以方便的插在树莓派上面的板子,还为其配套提供了SDK,移植了Arduino上的驱动程序。安装完SDK后,就可以像在Arduino平台底下一样,非常轻松的驱动这块板子。
特色
- 为树莓派量身定做,不用接线,即插即用
- 可堆叠
- 0.96英寸 128*64 像素点单色OLED屏幕
- 提供1组Grove电子积木口
规格
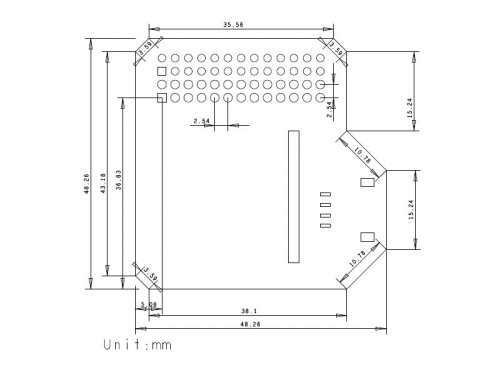
| PCB大小 | 48.35mm X 48.47mm X1.6mm |
| 接口 | RPI 26pins Interface X2,UART |
电气特性
| 特性 | 标示 | 最小值 | 正常值 | 最大值 | 单位 |
| 电源电压 | VDD | 3 | 3.3 | 3.5 | V |
| 最高输入电压 | VIH | 0.8XVDD | - | VDD | V |
| 最低输入电压 | VIL | 0 | - | 0.2XVDD | V |
| VDD可调电流 | IDD | - | 180 | 300 | uA |
硬件
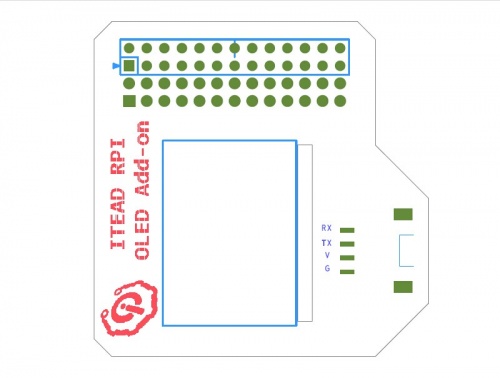
引脚图
| Pin Index | Pin Name | OLED 2864 pin | Description |
| 1 | 3V3 | - | |
| 2 | 5V | - | |
| 3 | SDA | SDA | |
| 4 | 5V | - | |
| 5 | SCL | SCL | |
| 6 | GND | - | |
| 7 | GPIO7 | UART TXD | |
| 8 | TXD | ||
| 9 | GND | ||
| 10 | RXD | UART RXD | |
| 11 | GPIO0 | ||
| 12 | GPIO1 | ||
| 13 | GPIO2 | ||
| 14 | GND | ||
| 15 | GPIO3 | ||
| 16 | GPIO4 | RST# | |
| 17 | 3V3 | ||
| 18 | GPIO5 | ||
| 19 | MOSI | ||
| 20 | GND | ||
| 21 | MISO | ||
| 22 | GPIO6 | ||
| 23 | SCK | ||
| 24 | CE0 | ||
| 25 | GND | ||
| 26 | CE1 |
使用说明
- 将RpiOledAddon插到RPI V2上面,上电。
- 修改文件 /etc/modprobe.d/raspi-balcklist.conf
- 修改后的编码如下:请将^符号修改成#
- ^blacklist spi-bcm2708
- ^blacklist i2c-bcm2708
- 修改 /etc/modules
- 在最后添加一行如下代码
- i2c-dev
- 重启树莓派
- 从这个链接https://github.com/itead/SDK 下载安装SDK
- 进入这个目录 libraries/itead_SSD1306/examples/oled_Animation_Sample/, 编译和运行文件 oled_Animation_Sample.ino
- 编译 oled_Animation_Sample.ino 指令如下
- $ iteadcompile OLED oled_Animation_Sample.ino
- 运行指令如下
- $ sudo ./OLED
- OLED会出现一个跳舞的小人。
文件下载
原理图----File:SCH IM140714003.pdf
有用链接
https://github.com/itead/SDK/tree/master/libraries/itead_SSD1306
 Notice