|
|
| (10 intermediate revisions by the same user not shown) |
| Line 1: |
Line 1: |
| − | ==Overview==
| + | {| class="FCK__ShowTableBorders" align="left" |
| − | [[File:IM140714003_3.JPG|thumb|400px|right]]
| + | |
| − | There are seldom OLED add-ons customized for Raspberry Pi in the open source hardware market. In a lot of projects, we only need to display little information such as the state of system or IP. What’s more, when we have a high requirement for its portability, it’s unsuitable to connect a big screen to Raspberry Pi via HDMI interface. Thus, a tiny OLED add-on can satisfy this demand.
| + | |
| − | | + | |
| − | OLED add-on with built-in 0.96" 128*64 OLED and SSD1306 control chip is customized for Raspberry Pi. Every single pixel in OLED can be lighted up or off by this SSD1306 control chip.
| + | |
| − | | + | |
| − | We not only offer an easily-plugged add-on for Raspberry Pi, but also provide an SDK that help you transplant Arduino’s driver into Raspberry Pi. After installing the SDK, you can drive this add-on as easily as you do on Arduino.
| + | |
| − | | + | |
| − | ==Features== | + | |
| − | | + | |
| − | *Customized for Raspberry Pi, plug and play without wiring
| + | |
| − | *0.96" OLED with 128*64 pixels
| + | |
| − | *Stackable
| + | |
| − | *Coming with one Grove interface for Electronic bricks
| + | |
| − |
| + | |
| − | | + | |
| − | | + | |
| − | ==Specification==
| + | |
| − | | + | |
| − | {| border="1"
| + | |
| − | | PCB size||48.35mm X 48.47mm X1.6mm
| + | |
| | |- | | |- |
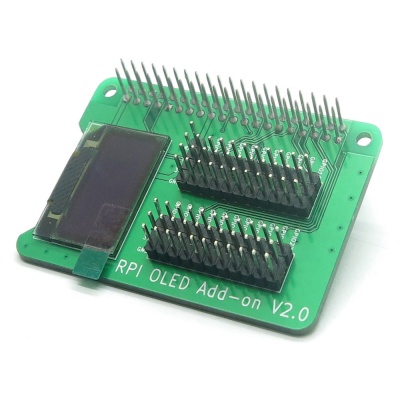
| − | | Interface||RPI 26pins Interface X2,UART | + | | [[File:IM150627004 (4).jpg|400px|Rasspberry Pi OLED Add-on V2.0]] <br> |
| − | |-
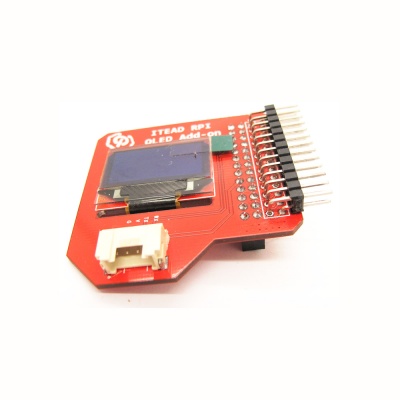
| + | | [[File:IM140714003_3.JPG|400px|Rasspberry Pi OLED Add-on V1.0]]<br> |
| − | |} | + | |
| − | | + | |
| − | ==Electrical Characteristics==
| + | |
| − | | + | |
| − | {| class="wikitable"
| + | |
| − | | align="center" style="background:#f0f0f0;"|'''Characteristics'''
| + | |
| − | | align="center" style="background:#f0f0f0;"|'''Symbol'''
| + | |
| − | | align="center" style="background:#f0f0f0;"|'''Min'''
| + | |
| − | | align="center" style="background:#f0f0f0;"|'''Typ'''
| + | |
| − | | align="center" style="background:#f0f0f0;"|'''Max'''
| + | |
| − | | align="center" style="background:#f0f0f0;"|'''Unit'''
| + | |
| − | |-
| + | |
| − | | Power supply voltage||VDD||3||3.3||3.5||V
| + | |
| − | |-
| + | |
| − | | High input voltage||VIH||0.8XVDD||-||VDD||V
| + | |
| − | |-
| + | |
| − | | Low input voltage||VIL||0||-||0.2XVDD||V
| + | |
| − | |-
| + | |
| − | | Operation current for VDD||IDD||-||180||300||uA
| + | |
| | |- | | |- |
| | + | | <div style="text-align: center">[[RPI Arduino OLED Add-on V2.0|RPI Arduino OLED Add-on V2.0(SKU:IM150627004 )]]</div> |
| | + | | <div style="text-align: center">[[RPI Arduino OLED Add-on V1.0|RPI Arduino OLED Add-on V1.0(SKU: IM140714003)]]</div> |
| | |} | | |} |
| | + | <br clear="all"> |
| | | | |
| − | ==Hardware== | + | ==V2.0 Change List== |
| − | [[File:IM140714003pic1.jpg|500px]]
| + | *Coming with 2.54 interface for Electronic bricks |
| − | [[File:IM140714003pic2.jpg|500px]]
| + | |
| − | [[File:IM140714003pic3.jpg|500px]]
| + | |
| − | | + | |
| − | ==Pin Map==
| + | |
| − | | + | |
| − | {| class="wikitable"
| + | |
| − | | align="center" style="background:#f0f0f0;"|'''Pin Index'''
| + | |
| − | | align="center" style="background:#f0f0f0;"|'''Pin Name'''
| + | |
| − | | align="center" style="background:#f0f0f0;"|'''OLED 2864 pin'''
| + | |
| − | | align="center" style="background:#f0f0f0;"|'''Description'''
| + | |
| − | |-
| + | |
| − | | 1||3V3||-||
| + | |
| − | |-
| + | |
| − | | 2||5V||-||
| + | |
| − | |-
| + | |
| − | | 3||SDA||SDA||
| + | |
| − | |-
| + | |
| − | | 4||5V||-||
| + | |
| − | |-
| + | |
| − | | 5||SCL||SCL||
| + | |
| − | |-
| + | |
| − | | 6||GND||-||
| + | |
| − | |-
| + | |
| − | | 7||GPIO7||||UART TXD
| + | |
| − | |-
| + | |
| − | | 8||TXD||||
| + | |
| − | |-
| + | |
| − | | 9||GND||||
| + | |
| − | |-
| + | |
| − | | 10||RXD||||UART RXD
| + | |
| − | |-
| + | |
| − | | 11||GPIO0||||
| + | |
| − | |-
| + | |
| − | | 12||GPIO1||||
| + | |
| − | |-
| + | |
| − | | 13||GPIO2||||
| + | |
| − | |-
| + | |
| − | | 14||GND||||
| + | |
| − | |-
| + | |
| − | | 15||GPIO3||||
| + | |
| − | |-
| + | |
| − | | 16||GPIO4||RST#||
| + | |
| − | |-
| + | |
| − | | 17||3V3||||
| + | |
| − | |-
| + | |
| − | | 18||GPIO5||||
| + | |
| − | |-
| + | |
| − | | 19||MOSI||||
| + | |
| − | |-
| + | |
| − | | 20||GND||||
| + | |
| − | |-
| + | |
| − | | 21||MISO||||
| + | |
| − | |-
| + | |
| − | | 22||GPIO6||||
| + | |
| − | |-
| + | |
| − | | 23||SCK||||
| + | |
| − | |-
| + | |
| − | | 24||CE0||||
| + | |
| − | |-
| + | |
| − | | 25||GND||||
| + | |
| − | |-
| + | |
| − | | 26||CE1||||
| + | |
| − | |-
| + | |
| − | |}
| + | |
| − | | + | |
| − | ==Instruction==
| + | |
| − | *1.Plug OLED add-on into Raspberry Pi and power up | + | |
| − | *2.Download the SDK from this link: https://github.com/iteadsw/SDK and then install it
| + | |
| − | *3.Enter into the directory '''libraries/itead_SSD1306/examples/oled_Animation_Sample/''', then compile and run this file '''oled_Animation_Sample.ino'''
| + | |
| − | :Command as below to compile oled_Animation_Sample.ino
| + | |
| − | ::$ iteadcompile LED led.ino
| + | |
| − | :Command to run this program
| + | |
| − | ::$ sudo ./LED
| + | |
| − | *4.When the compilation is done, you can see a little man dancing on OLED.
| + | |
| − | | + | |
| − | ==Download==
| + | |
| − | [[File:SCH_IM140714003.pdf]]
| + | |
| − | | + | |
| − | ==Useful Link==
| + | |
| − | https://github.com/iteadsw/SDK
| + | |
| − | https://github.com/iteadsw/SDK/tree/master/libraries/itead_SSD1306
| + | |


 Notice