Difference between revisions of "MotoMama"
(→Arduino Socket defination) |
m (→Download) |
||
| (6 intermediate revisions by 2 users not shown) | |||
| Line 7: | Line 7: | ||
motor and stepping motors. MotoMama is designed to be easy with other | motor and stepping motors. MotoMama is designed to be easy with other | ||
sensors or wireless modules. | sensors or wireless modules. | ||
| + | |||
| + | Go shopping [http://imall.iteadstudio.com/im120417005.html MotoMama (IM120417005)] | ||
==Features== | ==Features== | ||
| Line 45: | Line 47: | ||
| Power Voltage (Vlogic) ||4.5||5||5.5||VDC | | Power Voltage (Vlogic) ||4.5||5||5.5||VDC | ||
|- | |- | ||
| − | | Power Voltage(Vsupply) || | + | | Power Voltage(Vsupply) ||7||-||15||VDC |
|- | |- | ||
| Input Voltage VH:||4.5||5||5.5||V | | Input Voltage VH:||4.5||5||5.5||V | ||
| Line 117: | Line 119: | ||
|} | |} | ||
| − | ===Arduino Socket | + | ===Arduino Socket definition=== |
{| class="wikitable" | {| class="wikitable" | ||
|- | |- | ||
| Line 165: | Line 167: | ||
==Installation== | ==Installation== | ||
| + | MotoMama can drive two DC motors at the same time. | ||
| + | |||
| + | OUT1/OUT2 is completely symmetrical as OUT3/OUT4 on the board. These pins | ||
| + | is connect to the DC motors. The output voltage depends on VIN. | ||
| + | |||
| + | DC motor control input port A has three pins, In1, In2 and EnA. In1 and In2 are | ||
| + | digital ports which be used to control the direction of the motor, EnA is | ||
| + | connecting with PWM port of control board to control the speed of motor. | ||
| + | |||
| + | {| class="wikitable" | ||
| + | |- | ||
| + | | align="center" style="background:#f0f0f0;"|'''EnA''' | ||
| + | | align="center" style="background:#f0f0f0;"|'''In1''' | ||
| + | | align="center" style="background:#f0f0f0;"|'''In2''' | ||
| + | | align="center" style="background:#f0f0f0;"|'''Description''' | ||
| + | |- | ||
| + | | 0||X||X||Free Running Motor Stop | ||
| + | |- | ||
| + | | 1||1||0||Forward | ||
| + | |- | ||
| + | | 1||0||1||Reverse | ||
| + | |- | ||
| + | | 1||In1=In2||In1=In2||Fast Motor Stop | ||
| + | |- | ||
| + | | EnB||In3||In4||Description | ||
| + | |- | ||
| + | | 0||X||X||Free Running Motor Stop | ||
| + | |- | ||
| + | | 1||1||0||Forward | ||
| + | |- | ||
| + | | 1||0||1||Reverse | ||
| + | |- | ||
| + | | 1||In3=In4||In3=In4||Fast Motor Stop | ||
| + | |} | ||
| + | |||
| + | Port A is used to control the motor that connect with OUT1 and OUT2, Port B is | ||
| + | used to control the motor that connect with OUT3 and OUT4. | ||
| + | |||
| + | The EnA, EnB, ln1, ln2, ln3, ln4 can be used to drive the 4-wire stepping motor | ||
| + | which connects with OUT1, OUT2, OUT3 and OUT4. | ||
==Download== | ==Download== | ||
| + | [ftp://imall.iteadstudio.com/IM120417005_MotoMama/DS_IM120417005_MotoMama.pdf Datasheet for MotoMama] | ||
| + | |||
| + | [ftp://imall.iteadstudio.com/IM120417005_MotoMama/DS_L298N.pdf Datasheet for L298N] | ||
| + | |||
| + | [[:File:Motomama Shield 2.0.pdf | Schematic for MotoMama]] | ||
| + | |||
| + | [ftp://imall.iteadstudio.com/IM120417005_MotoMama/DC_MotoMama_Aruino_Test.zip Demo Code for MotoMama] | ||
==Useful Links== | ==Useful Links== | ||
| + | [http://youtu.be/vyP7ixD1-_M by Itead Studio <MotoMama And Makeblock 2WD Robot Kit>] | ||
Latest revision as of 07:48, 9 May 2016
Contents
Overview
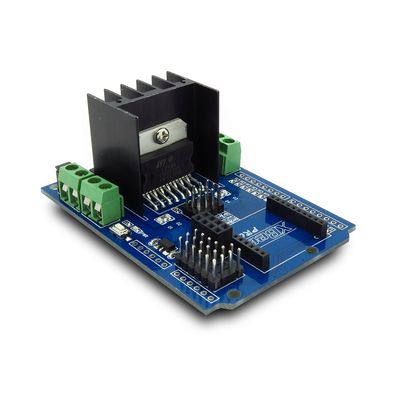
MotoMama is an H-Bridge motor driver shield bases on ST L298N chip. It is a high voltage, high current dual full-bridge driver which designed to accept standard TTL logic levels and drive inductive loads such as relays, solenoids, DC motor and stepping motors. MotoMama is designed to be easy with other sensors or wireless modules.
Go shopping MotoMama (IM120417005)
Features
- Light Weight, small dimension
- Super driver capacity
- FED protection
- Heavy load heat sink
- 2 DC motor/4 coil dual phrase stepper motor output
- Motor direction indication LED
- Pulse protection
- XBee/nRF24L01+ socket break out
- UART/IIC/Ads socket break out
- 4 standard mounting holes
Specifications
| PCB size | 80.36mm X 56.12mm X 1.6mm |
| Indicators | PWR, Motor direction |
| Power supply | 7~15V |
| Communication Protocol | XBee, nRF24L01+,UART, IIC |
| RoSH | Yes |
Electrical Characteristics
| Specification | Min | Type | Max | Unit |
| Power Voltage (Vlogic) | 4.5 | 5 | 5.5 | VDC |
| Power Voltage(Vsupply) | 7 | - | 15 | VDC |
| Input Voltage VH: | 4.5 | 5 | 5.5 | V |
| Input Voltage VL: | -0.3 | 0 | 0.5 | V |
| Current Consumption | - | - | 2000 | mA |
Hardware

Figure 1 Top Map
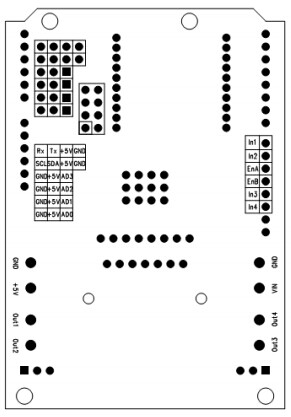
Figure 2 Bottom Map
| Interface | Pin | Description |
| UART | 1 | 5V supply |
| UART | 2 | Ground |
| UART | 3 | Tx |
| UART | 4 | Rx |
| AD0/1/2 | 1 | AD0/1/2 |
| AD0/1/2 | 2 | 5V supply |
| AD0/1/2 | 3 | Ground |
| IIC | 1 | Ground |
| IIC | 2 | 5V supply |
| IIC | 3 | Data wire of IIC |
| IIC | 4 | Clock wire of IIC |
| nRF24L01+ Socket | 1 | GND |
| nRF24L02+ Socket | 2 | VCC33 |
| nRF24L03+ Socket | 3 | CE(Chip Enable) |
| nRF24L04+ Socket | 4 | SPI_CS |
| nRF24L05+ Socket | 5 | SPI_SCK |
| nRF24L06+ Socket | 6 | SPI_MOSI |
| nRF24L07+ Socket | 7 | SPI_MISO |
| nRF24L07+ Socket | 8 | nRF24L01+ IRQ Output |
| XBee Socket | 1 | VCC33 |
| XBee Socket | 2 | Dout |
| XBee Socket | 3 | Din |
| XBee Socket | 10 | GNF |
| XBee Socket | 4,5,6,7,8,9,11,12,13,14,15,16,17,18,19,20 | No Connect |
Arduino Socket definition
| Pin | Description |
| D0 | XBee_Dout/UART_Rx |
| D1 | XBee_Din/UART_Tx |
| D2 | nRF24L01+_MISO |
| D3 | nRF24L01+_MOSI |
| D4 | nRF24L01+_SCK |
| D5 | nRF24L01+_CS |
| D6 | nRF24L01+_CE |
| D7 | NC |
| D8 | In1 |
| D9 | In2 |
| D10 | EnA |
| D11 | EnB |
| D12 | In3 |
| D13 | In4 |
| A0 | AD0 |
| A1 | AD1 |
| A2 | AD2 |
| A3 | AD3 |
| A4 | IIC_SCL |
| A5 | IIC_SDA |
Installation
MotoMama can drive two DC motors at the same time.
OUT1/OUT2 is completely symmetrical as OUT3/OUT4 on the board. These pins is connect to the DC motors. The output voltage depends on VIN.
DC motor control input port A has three pins, In1, In2 and EnA. In1 and In2 are digital ports which be used to control the direction of the motor, EnA is connecting with PWM port of control board to control the speed of motor.
| EnA | In1 | In2 | Description |
| 0 | X | X | Free Running Motor Stop |
| 1 | 1 | 0 | Forward |
| 1 | 0 | 1 | Reverse |
| 1 | In1=In2 | In1=In2 | Fast Motor Stop |
| EnB | In3 | In4 | Description |
| 0 | X | X | Free Running Motor Stop |
| 1 | 1 | 0 | Forward |
| 1 | 0 | 1 | Reverse |
| 1 | In3=In4 | In3=In4 | Fast Motor Stop |
Port A is used to control the motor that connect with OUT1 and OUT2, Port B is used to control the motor that connect with OUT3 and OUT4.
The EnA, EnB, ln1, ln2, ln3, ln4 can be used to drive the 4-wire stepping motor which connects with OUT1, OUT2, OUT3 and OUT4.
 Notice
